jps services
  • Home Page
  • GIS Training Courses
    • QGIS Training Courses
    • ArcGIS Training Courses
    • MapInfo Pro Training Courses >
      • MapBasic Training Course
  • About
  • Blog

Integrating QGIS with PHP: Building a Simple QGIS Plugin

25/9/2023

0 Comments

 
Geographic Information Systems (GIS) enthusiasts are continually exploring ways to enhance the functionality of their favourite GIS software, QGIS. While QGIS itself is a powerful tool, its extensibility through plugins allows users to customise it to their specific needs. In this blog post, we'll dive into the world of QGIS plugins and explore a unique integration—linking QGIS with PHP. As a GIS user, you'll gain insights into QGIS plugin development and learn how to create a simple QGIS plugin that interacts with a PHP web application.

The Power of QGIS Plugins
QGIS plugins are small software add-ons that extend the capabilities of QGIS. Whether you're looking to streamline workflows, access additional data sources, or perform complex spatial analyses, there's likely a QGIS plugin that can help. These plugins are developed by the QGIS community and third-party developers, making it possible to tailor QGIS to your specific needs.

Getting Started with QGIS Plugin Development
Before we look at PHP integration, let's cover the basics of QGIS plugin development:

1. Development Environment Setup
To get started with QGIS plugin development, you'll need a development environment. Most QGIS plugins are written in Python, so having a basic understanding of Python is essential. Install Python, QGIS, and Qt Designer (a visual tool for designing user interfaces) to set up your development environment.

2. Plugin Builder
QGIS offers a handy Plugin Builder tool that simplifies the creation of new plugins. This tool generates a basic plugin template, including the necessary files and folder structure. It's an excellent starting point, especially for beginners, as it takes care of some of the initial setup complexities.
​3. Plugin Development
Once your development environment is set up, you can start coding your QGIS plugin. QGIS plugins typically consist of a combination of Python scripts, XML files for defining user interfaces, and resources like icons or images.

4. Testing and Debugging
QGIS provides a testing framework that allows you to check your plugin's functionality within the QGIS environment. Proper testing and debugging are essential to ensure your plugin works as expected.

5. Documentation and Distribution
Documentation is crucial for users who want to install and use your plugin. Fortunately, QGIS provides tools to create user-friendly documentation. After thoroughly testing and documenting your plugin, you can distribute it to others through the official QGIS Plugin Repository or other platforms.

PHP Integration with QGIS
Now, let's examine the integration of QGIS with PHP. While Python is the primary language for QGIS plugin development, you can indirectly integrate PHP with QGIS through the following steps:

1. Create a QGIS Plugin
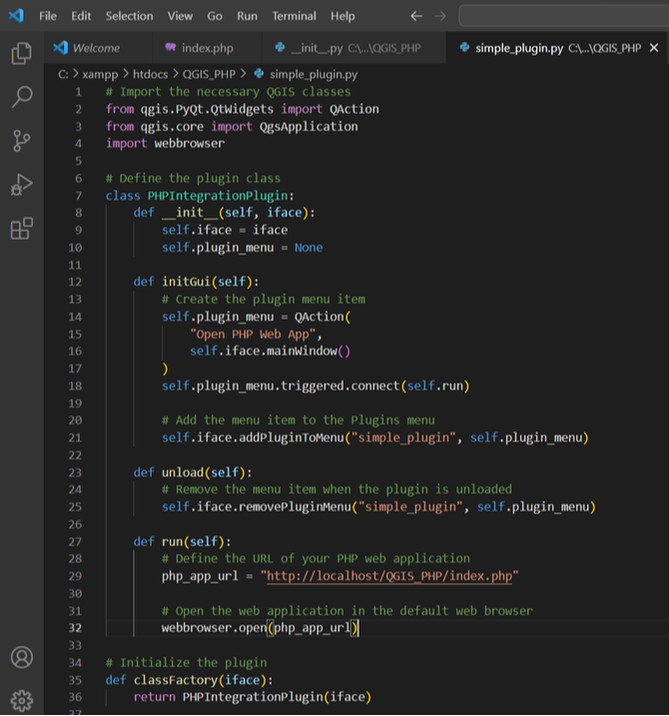
In our example, we'll create a simple QGIS plugin that opens a PHP web application when a menu item is clicked.

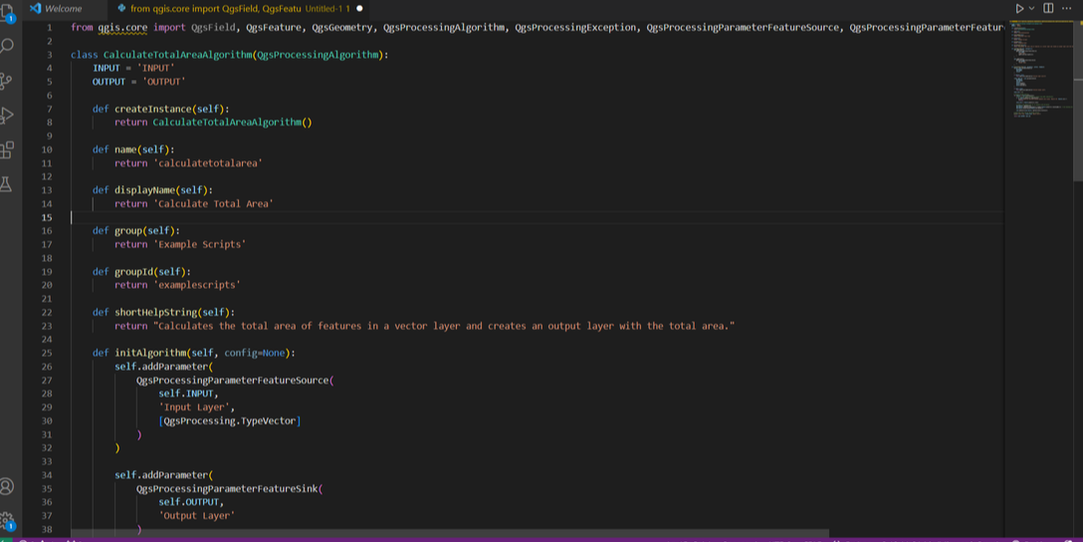
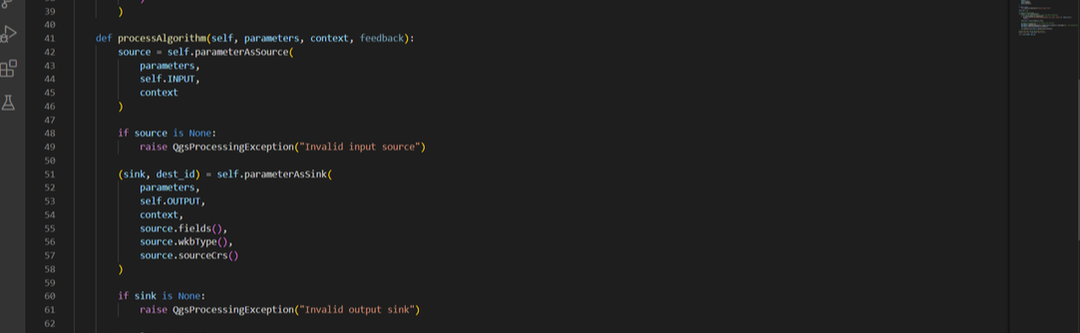
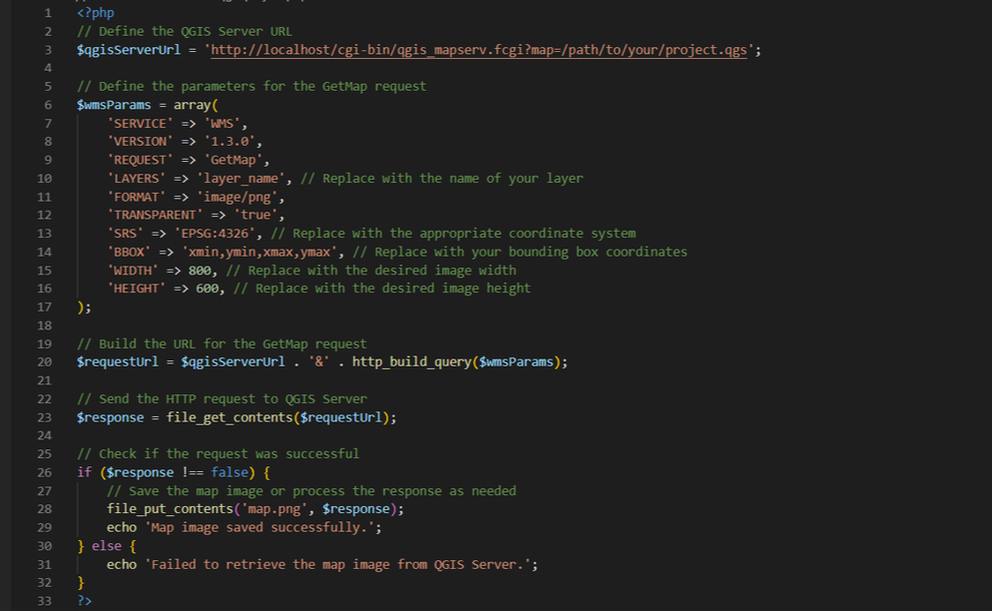
Here's the code for the QGIS plugin:
Picture
Picture
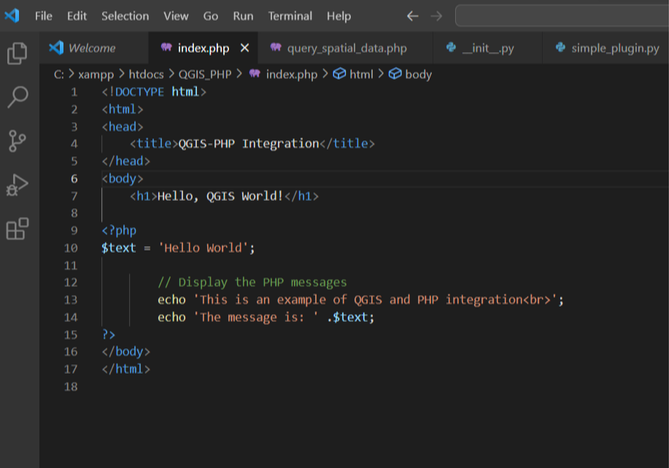
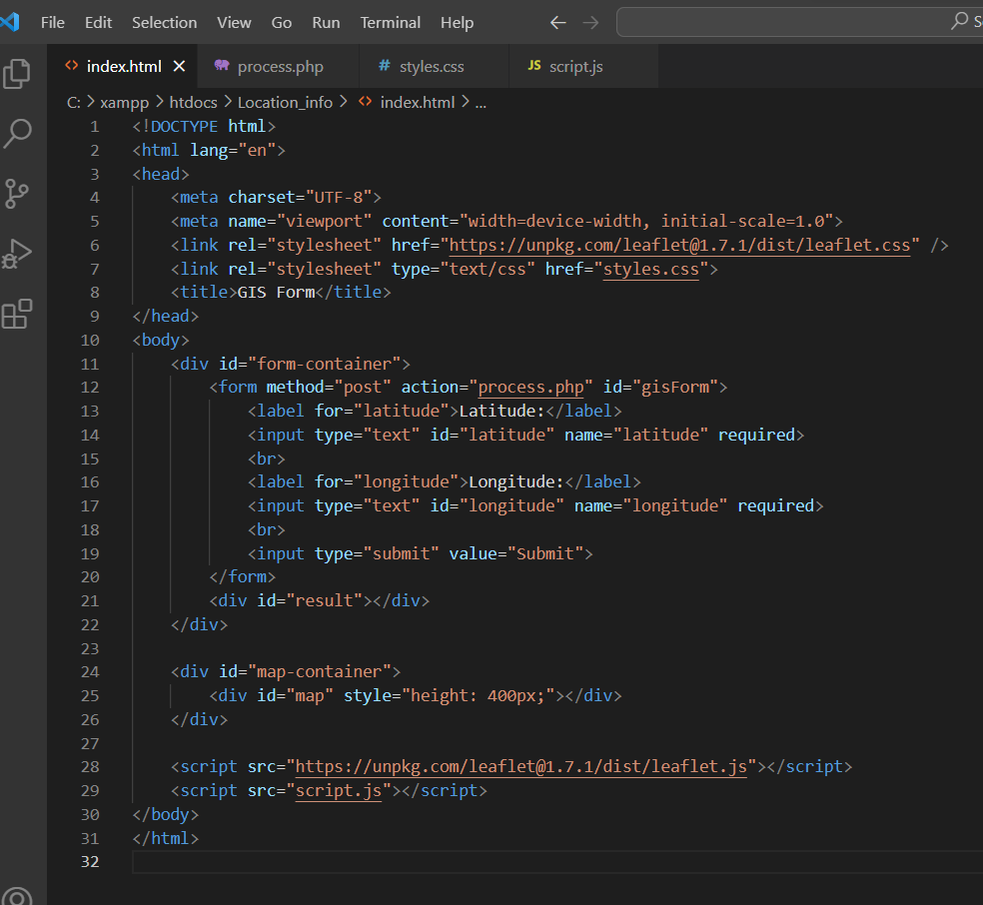
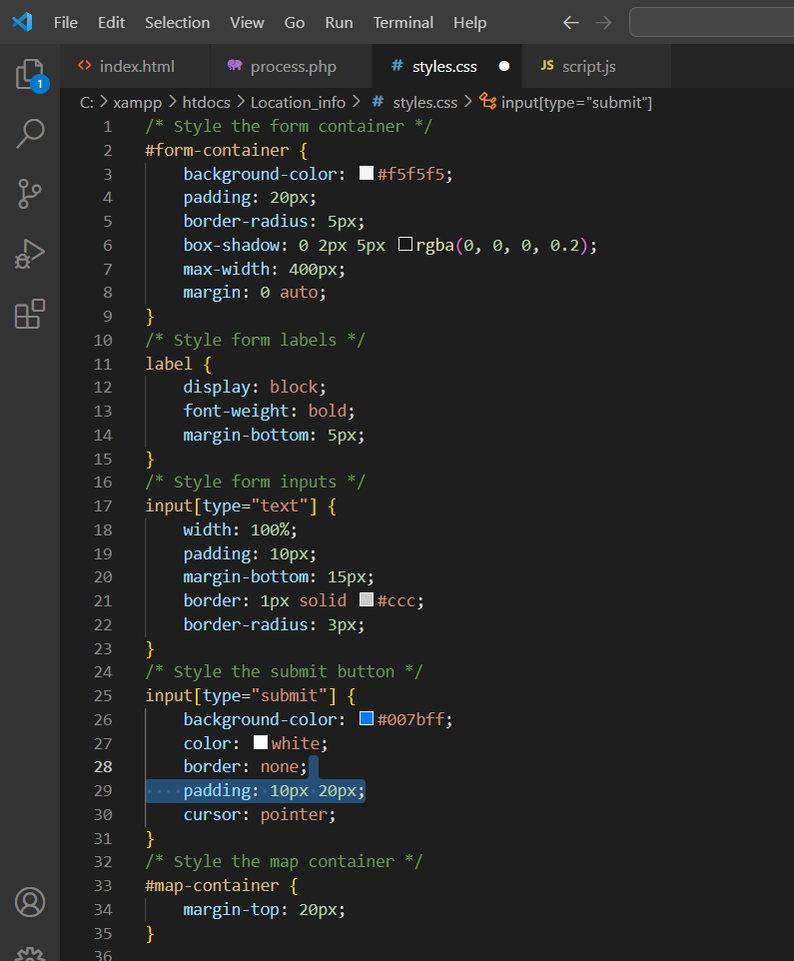
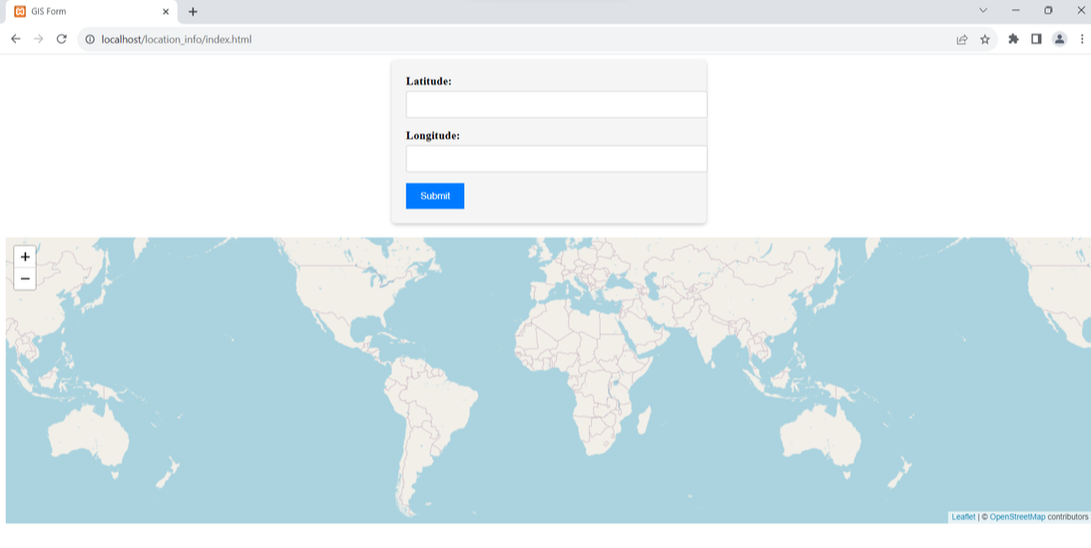
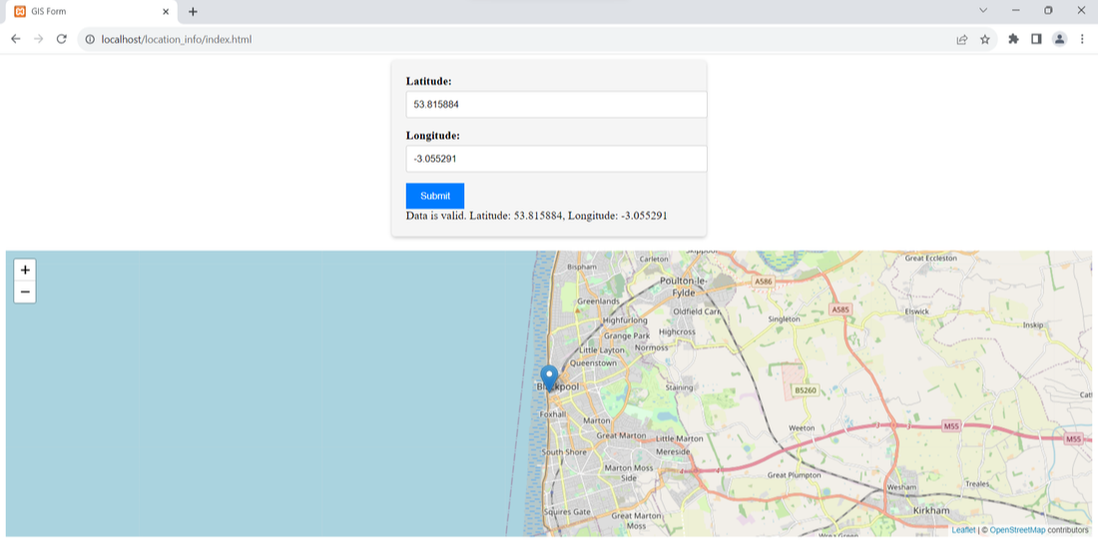
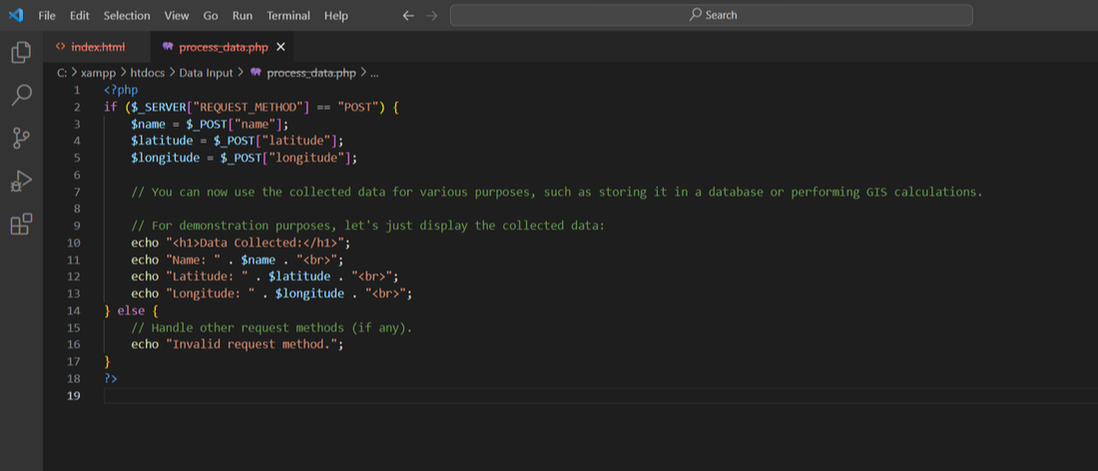
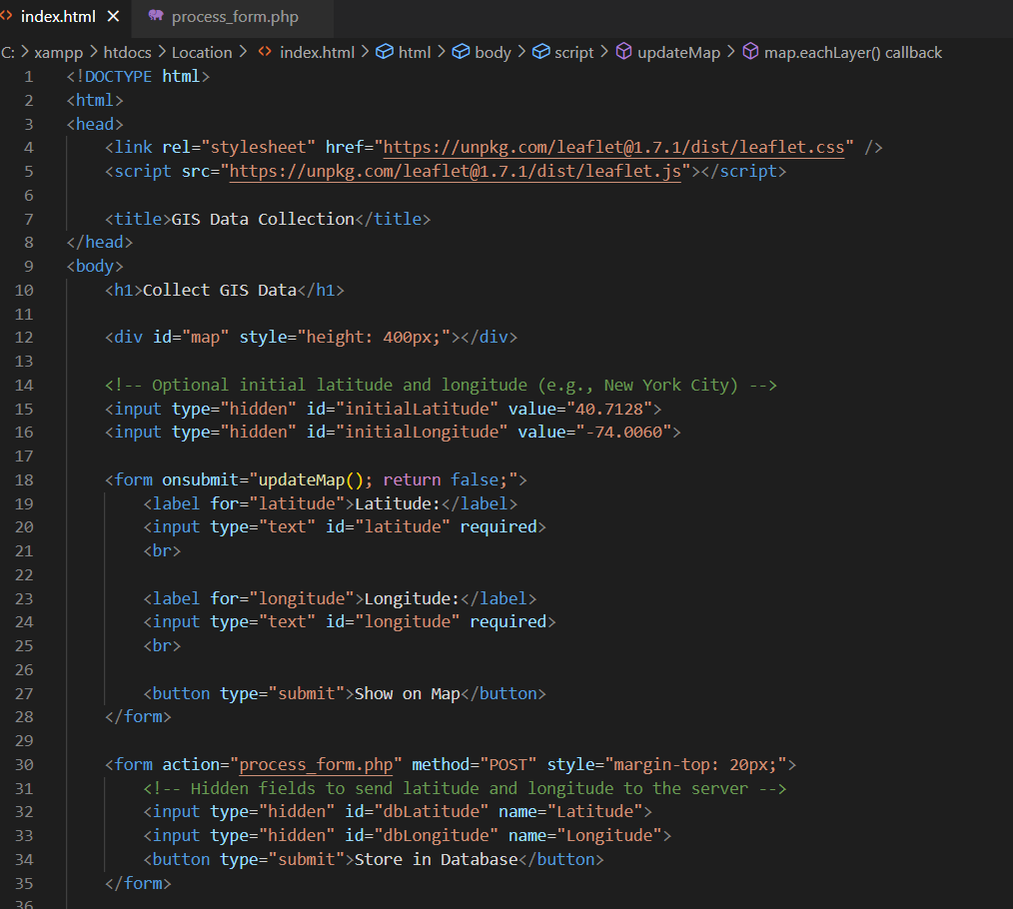
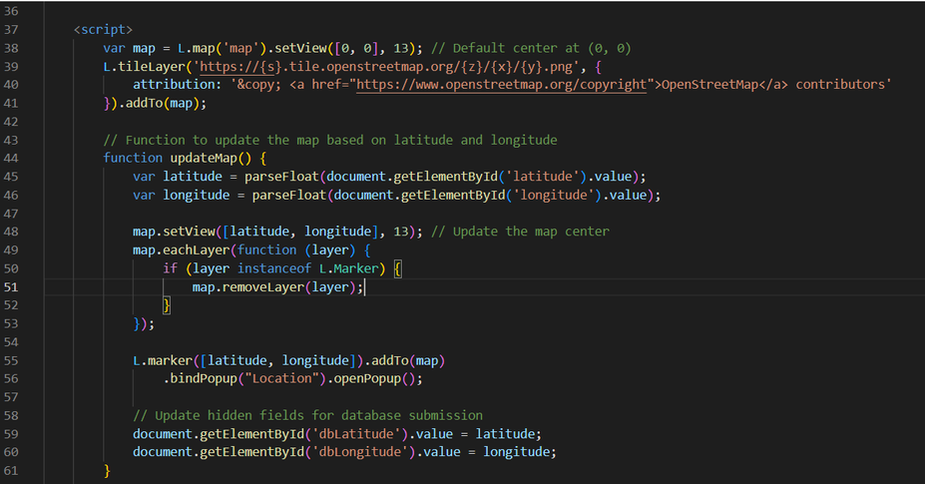
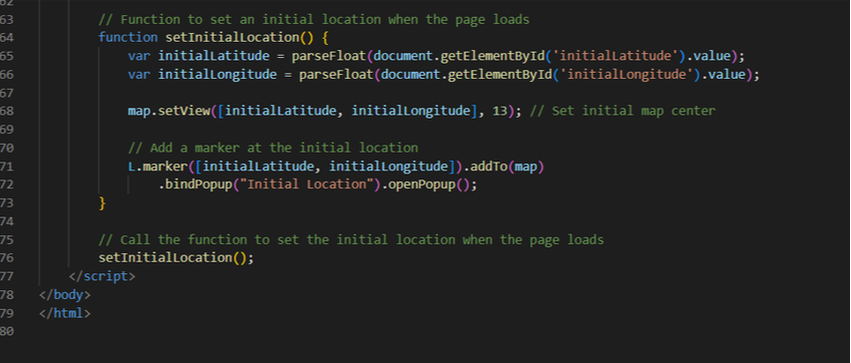
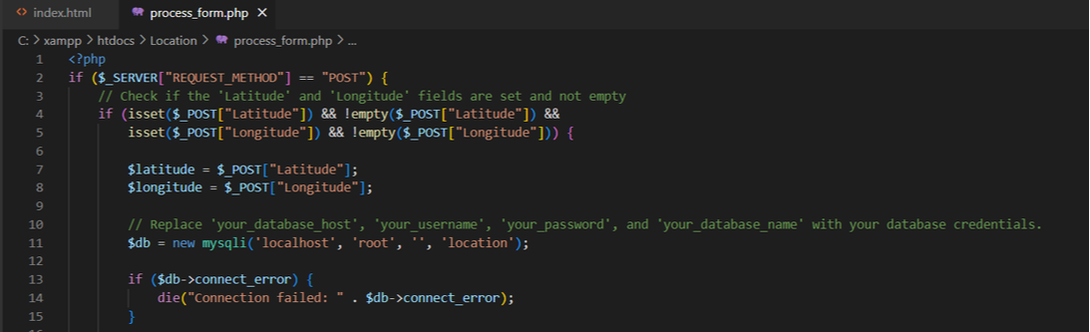
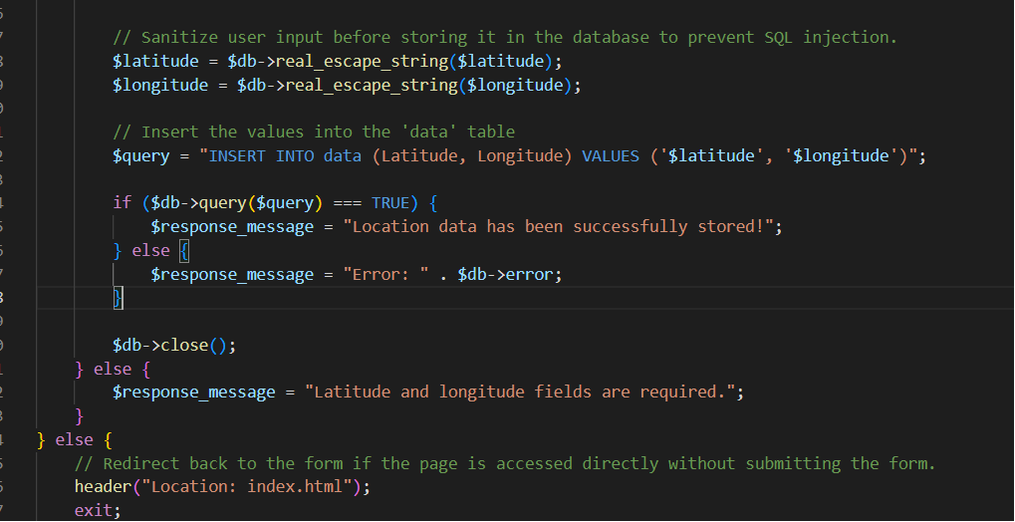
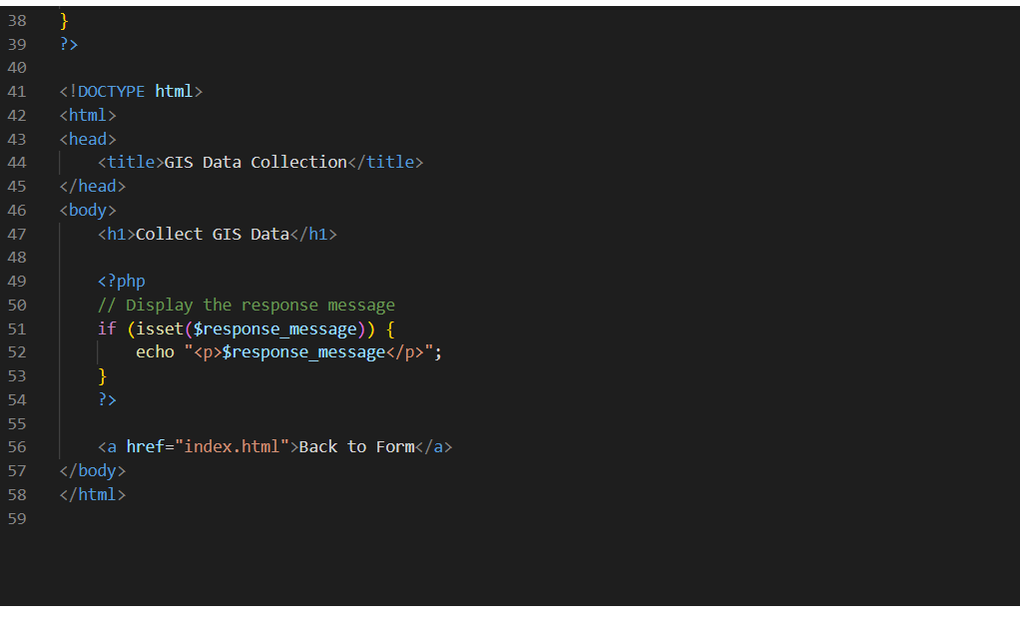
2. Create a PHP Web Application
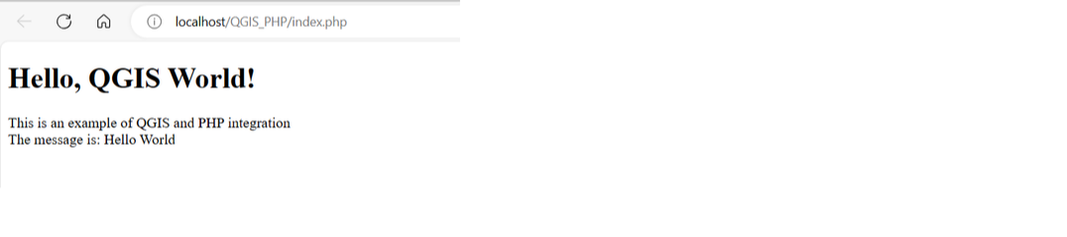
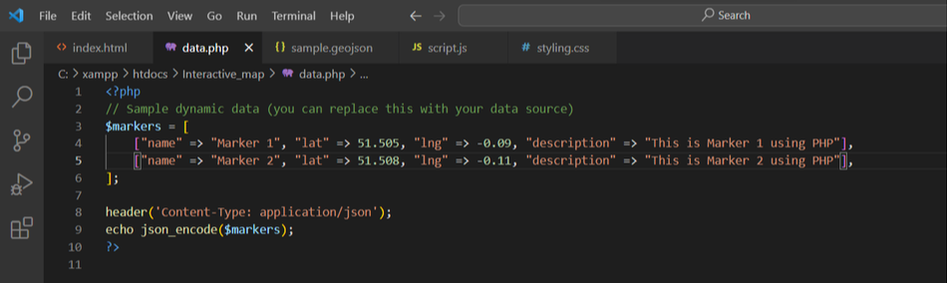
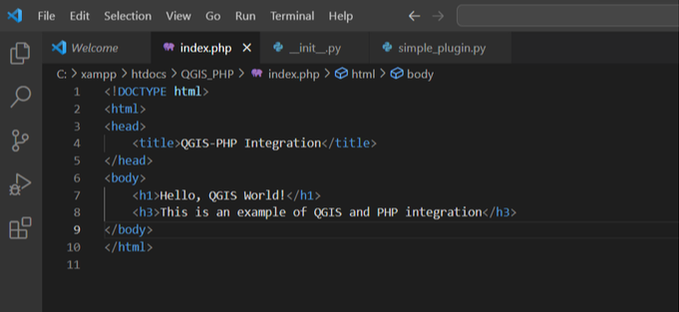
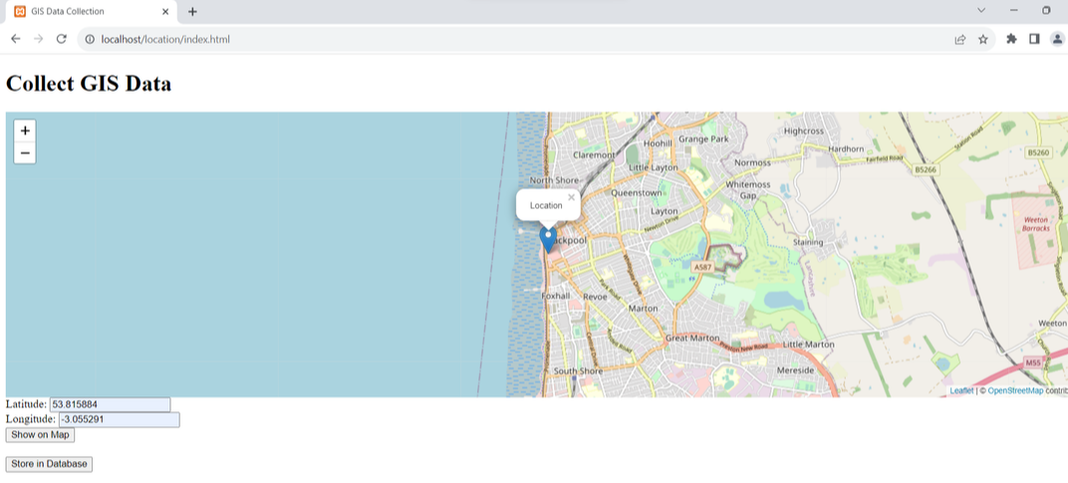
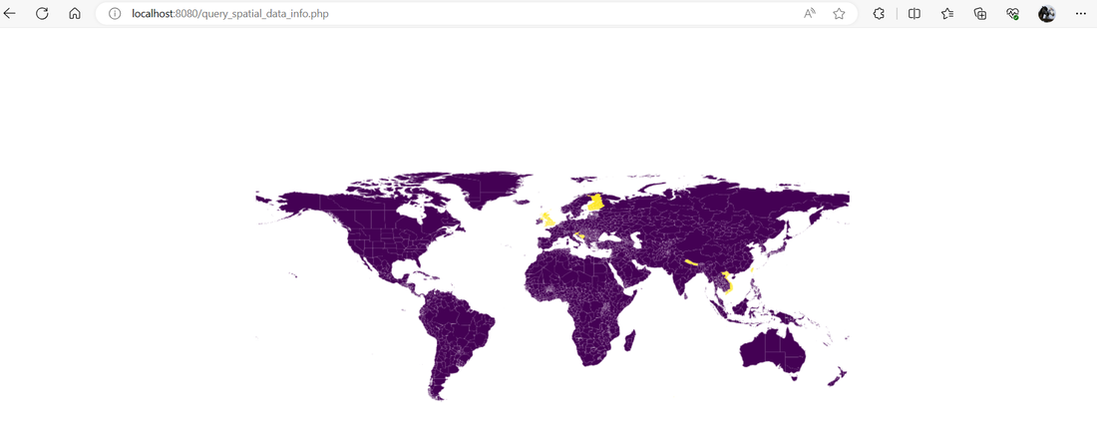
Next, develop a simple PHP web application that serves as the integration point between QGIS and PHP. Your PHP application can offer various functionalities, such as displaying maps, running spatial queries, or visualizing GIS data. For simplicity, we'll create an example that displays a "Hello, QGIS World!" message.
Picture
3. Deploy Your PHP Application
Host your PHP web application on a web server or use a local web server like XAMPP or WAMP for development. Ensure that your PHP application is accessible via a URL.

4. Install and Use the QGIS Plugin
Follow the steps below to install and use the QGIS plugin:

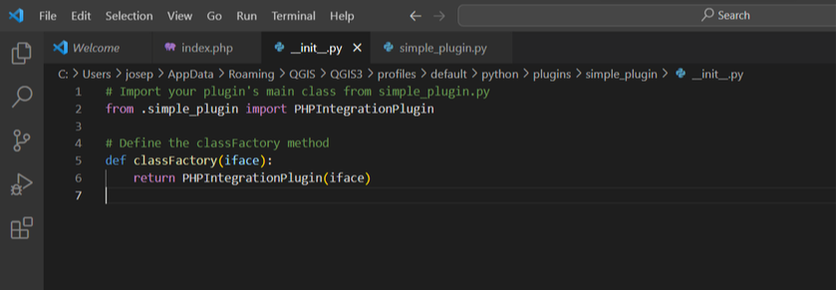
- Save the QGIS plugin code as a `.py` file, such as simple_plugin.py.
- Copy the file to the QGIS plugins directory. On most systems, this directory is located at:
  • Linux: ~/.local/share/QGIS/QGIS3/profiles/default/python/plugins
  • Windows: C:\Users\YourUsername\AppData\Roaming\QGIS\QGIS3\profiles\default\python\plugins
- Start or restart QGIS.
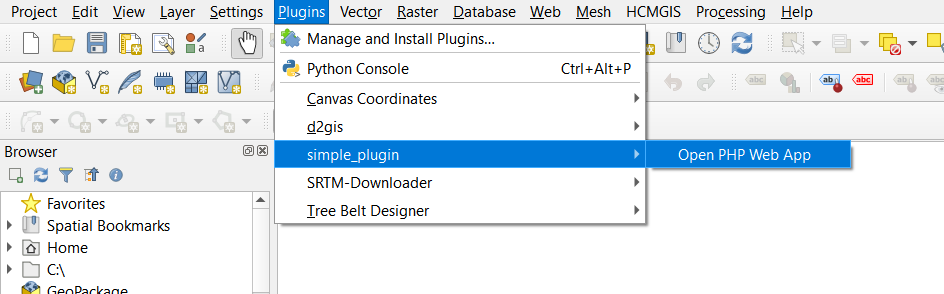
- Go to the "Plugins" menu in QGIS, and you should see "simple_plugin" as an option.
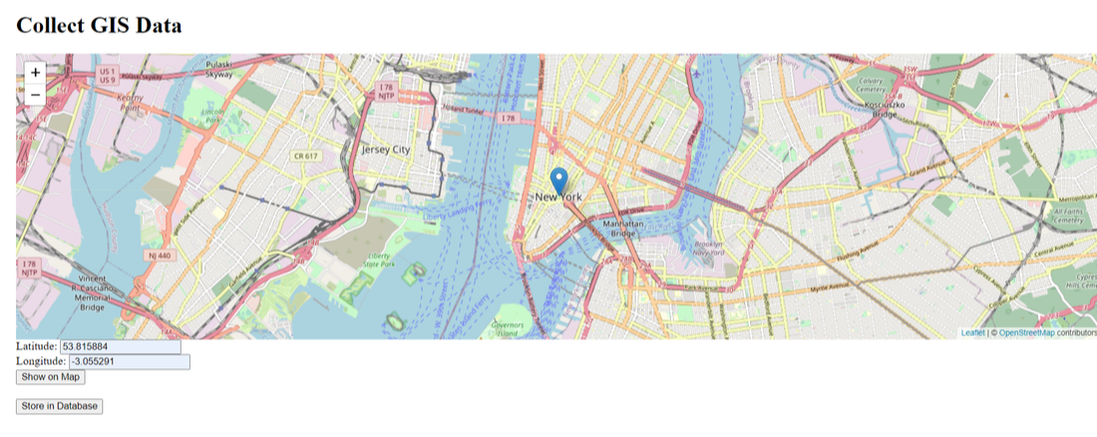
- Click "simple_plugin," and it will open the PHP web application in your default web browser.
Picture

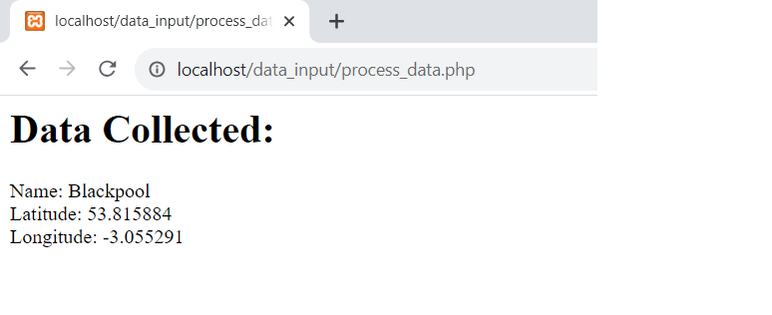
When you click on the simple_plugin  it will open the default browser and display a message as in the example below.
Picture
​In this blog post, we explored QGIS plugin development and created a simple QGIS plugin that integrates with a PHP web application. While QGIS primarily relies on Python for plugin development, the indirect integration with PHP via QGIS plugins and web applications opens up exciting possibilities for extending QGIS's functionality. Whether you're building web-based GIS applications or simply customizing your QGIS experience, this integration can help you achieve your geospatial goals.
0 Comments

Creating Interactive Maps that Respond to User Actions with PHP, JavaScript and Leaflet

24/9/2023

0 Comments

 
Interactive maps are a powerful tool for visualising geographical data and engaging users. Whether you're a beginner or an intermediate GIS (Geographic Information Systems) user, this guide will walk you through the process of creating dynamic, interactive maps that respond to user actions. We'll use a combination of PHP, JavaScript, CSS, HTML, GeoJSON and the Leaflet library to achieve this.

Prerequisites:
Before we begin creating interactive maps, make sure you have the following tools and knowledge:

1. Basic understanding of HTML, CSS, and JavaScript.
2. Familiarity with PHP for server-side scripting.
3. A code editor (e.g., Visual Studio Code, Sublime Text).
4. A web server (e.g., Apache, Nginx) for serving PHP files.

Setting Up Your Development Environment:

1. Install Leaflet: Start by downloading the Leaflet library and include it in your HTML file.
2. Create a New HTML File: Create an HTML file (e.g., `index.html`) where you'll build your interactive map.
Picture
Building the Interactive Map:

Let's create a simple interactive map with a few features:

1. Setting Up the Map:
​In your JavaScript file:
Picture
Picture
2. Adding Markers:
Picture
3. Adding PHP Data:
You can use PHP to make your map dynamic by fetching and displaying data from a server-side source. For example, you could use PHP to retrieve data from a database and display it as markers on the map.
Picture
4. Adding GeoJSON Data:
Picture
Interactive Map Example
Picture
​Creating interactive maps that respond to user actions can be a rewarding experience for GIS enthusiasts. By combining PHP, JavaScript, CSS, HTML, and the Leaflet library, you can build powerful maps that engage your audience. This guide should serve as a starting point for both beginners and intermediate users of GIS. Explore further, experiment, and create maps that convey meaningful information and provide valuable user experiences.
0 Comments

Harnessing the Power of PHP in GIS: Mastering Forms and User Input Security

22/9/2023

0 Comments

 
Geographic Information Systems (GIS) have become an indispensable tool for professionals in various fields, from urban planning to environmental management. PHP, a versatile server-side scripting language, can be a valuable asset in building GIS applications. In this blog post, we'll explore the critical aspect of working with forms and user input in a GIS environment, focusing on the importance of validating and sanitizing user input for security. This guide is tailored for intermediate GIS users looking to enhance their PHP skills in this context.
Forms play a pivotal role in GIS applications, allowing users to input data, perform queries, and interact with maps. Whether you're creating a web-based GIS system or adding functionality to an existing one, PHP can help streamline the process of handling user input.
Form Validation: Ensuring Data Integrity
One of the primary responsibilities of a GIS application is to maintain data integrity. PHP's validation capabilities are invaluable in ensuring that users submit accurate and complete data. Here are some key considerations:

Client-side vs. Server-side Validation: While client-side validation can provide a smoother user experience, it's crucial to rely on server-side validation as the primary defence. Client-side validation can be bypassed, making server-side validation essential for security.

Data Type and Format Validation: Ensure that user input adheres to the expected data types and formats. For example, validate that latitude and longitude values are in the correct numerical format.

Range and Boundary Checks: Implement checks to ensure that input values fall within specified ranges. For instance, you can validate that a user-submitted coordinate lies within the geographic bounds of your map.
Input Sanitization: Guarding Against Security Threats
Beyond data integrity, security is a paramount concern when dealing with user input. Unsanitised user input can expose your GIS application to various vulnerabilities, including SQL injection and cross-site scripting (XSS) attacks. PHP offers several functions and techniques to mitigate these risks:

Escape User Input: Use functions like  mysqli_real_escape_string or prepared statements when interacting with a database. This prevents malicious SQL injection attempts.

HTML Entity Encoding: When displaying user input on web pages, encode it using htmlspecialchars to prevent XSS attacks. This ensures that any potential HTML or JavaScript within the input is treated as plain text.

File Upload Security: If your GIS application allows file uploads, enforce strict controls, such as limiting file types and performing server-side validation to check the uploaded files' integrity.

Regular Expressions: Employ regular expressions to validate and sanitize complex input, such as email addresses or URLs.

Best Practices for GIS Developers

Here are some best practices for GIS developers working with PHP and user input:
1. Modular Code: Break your code into modular functions or classes to handle different aspects of form processing, validation, and sanitization. This promotes code reusability and maintainability.

2. Error Handling: Implement robust error handling mechanisms to gracefully handle validation errors and provide meaningful feedback to users.

3. Logging: Maintain comprehensive logs of user input, especially when dealing with sensitive data or potentially malicious input. This can assist in troubleshooting and security audits.

4. Regular Updates: Keep your PHP version and libraries up to date to benefit from the latest security patches and enhancements.
​PHP can be a powerful ally for GIS developers when it comes to handling forms and user input. By mastering form validation and input sanitization techniques, you can not only ensure data integrity but also fortify your GIS application against security threats. Remember that security is an ongoing process, so stay vigilant and continuously update your knowledge to protect your GIS environment effectively.
In previous blog posts, we discussed the integration of PHP and JavaScript to create a Geographic Information System (GIS) form for entering latitude and longitude coordinates and displaying them on a map. Now, let's take it a step further by adding CSS (Cascading Style Sheets) to enhance the visual appeal and layout of our GIS form and map.

Code Example: Enhancing the GIS Form and Map

In this section, we'll provide you with a code example that demonstrates how to enhance your GIS form and map with CSS styling.

HTML Structure
Picture
CSS Styling
Picture
With these CSS enhancements, our GIS form now looks polished and professional, offering an improved user experience. Users will find it easier to input latitude and longitude coordinates, and the submit button is visually appealing.
Picture
The map, situated below the form, maintains a clear separation between the two elements and provides a visual representation of the entered coordinates. When valid coordinates are submitted, the map updates to display the location accurately.
Picture
Incorporating CSS into your GIS application not only improves aesthetics but also contributes to a user-friendly interface, making it more accessible and engaging
0 Comments

Processing GIS Form Data with PHP: A Beginner's Guide

21/9/2023

0 Comments

 
Geographic Information Systems (GIS) play a crucial role in various fields such as urban planning, environmental management, and location-based services. One common task in GIS is collecting and processing user input through web forms. In this beginner's guide, we will explore how to process form data with PHP, a server-side scripting language widely used for web development.
Understanding the Basics

Before we dive into the code, let's clarify a few fundamental concepts:

HTML Forms
HTML forms are a way for users to input data on a webpage. They consist of various input elements like text fields, checkboxes, radio buttons, and submit buttons. Users fill out these forms, and when they submit the data, it is sent to a server for processing.

PHP
PHP is a server-side scripting language that can handle form data, process it, and interact with databases. It is often used in conjunction with HTML to create dynamic web applications.

POST and GET Methods
HTML forms can use two primary methods to send data to the server: POST and GET. In this guide, we'll focus on the POST method, which is more secure and appropriate for handling sensitive information like user passwords.

Setting Up the HTML Form

Let's start by creating a simple HTML form that collects geographic data. For example, we'll create a form to collect a location name and coordinates (latitude and longitude):
Picture
In this code, we have created a simple HTML form with fields for name, latitude, and longitude. The action attribute specifies the PHP script that will process the data (in this case, `process_data.php`), and we've set the method attribute to "post" to use the POST method.

Processing Form Data with PHP

Now, let's create the PHP script `process_data.php` to handle the form data:
Picture
​In this PHP script, we first check if the request method is POST, which ensures that the form data is being submitted. We then use the `$_POST` superglobal to retrieve the values entered in the form fields and store them in variables.

Now, you can use this collected data for various GIS-related tasks, such as storing it in a database, performing spatial analysis, or displaying it on a map. In the following images we show the name, latitude and longitude fields completed.  Once the Submit button is pressed the process_data.php code displays the results in a new page.  Of course in a real application we would save this information to a relational database rather than just displaying the results.
Picture
​Processing form data with PHP is an essential skill for GIS beginners, as it allows you to gather user input and manipulate geographic information effectively.
Picture
​​
With this guide, you should have a solid foundation for creating HTML forms, collecting data, and using PHP to process and work with that data in your GIS applications. As you continue to explore GIS development, you'll find countless opportunities to leverage these skills to build powerful and interactive web-based geographic applications. Happy coding!
0 Comments

A Beginner's Guide to Using PHP for Building HTML Forms

20/9/2023

0 Comments

 
 If you are a complete beginner in the world of Geographic Information Systems (GIS) and looking to collect user input through web forms then this guide will take you through the basics of using PHP to create HTML forms for collecting user data. Whether you're building a GIS application, a survey tool, or any other web-based project, understanding how to create forms is an essential skill.

Why Use HTML Forms with PHP for GIS?

Before we dive into the nitty-gritty of building HTML forms with PHP, let's understand why this combination is so useful in the context of GIS applications.

1. User Interaction: GIS applications often require users to input location data, addresses, or other spatial information. HTML forms provide an interactive way for users to input this data.

2. Data Validation: PHP can be used to validate user input, ensuring that the data collected is accurate and adheres to predefined rules. This is crucial for maintaining data quality in GIS.

3. Data Processing: Once the user submits the form, PHP can process the data, perform calculations, or interact with GIS databases to generate relevant maps, reports, or visualisations.

4. Customisation: Using PHP, you can customise the form's appearance and behaviour to suit your specific GIS project's needs.

Now that we understand the importance of using PHP and HTML forms in GIS, let's look at the step-by-step process of creating one.

Step 1: Setting Up Your Development Environment

Before you start building your HTML form with PHP, make sure you have a development environment set up. You'll need a web server (like Apache), PHP installed, and a text editor for coding (e.g., Visual Studio Code, Sublime Text).

Step 2: Creating the HTML Form

Begin by creating an HTML file (e.g., index.html) and add the following code to create a simple form:

Picture
Picture
Picture
 Step 3: Creating the PHP Script

Create a new PHP file (e.g., process_form.php) to handle the form submission and data processing:

In this script, you can access the data submitted from the form using the `$_POST` superglobal. You can then perform any necessary validation or processing.
Picture
Picture
Picture
 Step 4: Testing Your Form

Start your web server and open your HTML form in a web browser (e.g., http://localhost/Location/index.html). Submit some data through the form to test it.
Picture
The user enters latitude and longitude to take the map from the default landing page to Blackpool!
Picture
By clicking on the Show on Map button the user is taken to the Blackpool map.
Picture
Clicking on the Store in Database button will save the latitude and longitude to a database.
 Step 5: Further Enhancements

As you become more comfortable with PHP and HTML forms, you can enhance your GIS application by adding features like data storage, user authentication, and more advanced form elements.

These are your first steps toward collecting user input for your GIS project using PHP and HTML forms. With practice, you'll be able to build more sophisticated forms and create powerful GIS applications that efficiently gather and process spatial data.
0 Comments

Querying and Filtering Spatial Data from QGIS Projects using PHP

2/9/2023

0 Comments

 
​Geographic Information Systems (GIS) play a crucial role in modern decision-making processes by allowing us to visualize, analyse, and interpret spatial data. QGIS (Quantum GIS) is a popular open-source GIS software that empowers users to create and manage spatial data easily. In this beginner-friendly guide, we'll explore how to query and filter spatial data from QGIS projects using PHP, a server-side scripting language. 

Prerequisites

Before we begin, you'll need to have the following in place:
1. QGIS Installed: Make sure you have QGIS installed on your computer. You can download it from the QGIS website.

2. PHP Installed: PHP should be installed on your server. You can download PHP from the PHP official website.

3. Spatial Data: You should have a QGIS project (.qgs) with spatial data layers that you want to query and filter.

Setting Up QGIS Project
1. Create or Open a QGIS Project: Launch QGIS and create a new project or open an existing one containing your spatial data layers.

2. Add Spatial Layers: Import or add the spatial data layers you want to work with into your project.

3.Save the Project: Save your QGIS project to ensure you don't lose any changes.

Writing PHP Code
Now, let's write some PHP code to query and filter the spatial data from your QGIS project. We'll use the OGR PHP library, which provides functions to work with geospatial data.
Picture

In this PHP code, we utilize the QGIS Server's Web Map Service (WMS) capabilities to request a map image. You should customize the parameters such as layer name, coordinate system (CRS), bounding box (BBOX), image dimensions (WIDTH and HEIGHT), and others to match your specific requirements.

Running the PHP Script
  1. Save the code above in a .php file (e.g., query_spatial_data.php).
  2. Upload the PHP file to your OSGeo4W apache web server.
  3. Access the PHP script through a web browser or execute it via the command line.
  4. You will see the map image saved in the current directory or receive a message if there's an issue
Picture
Conclusion
With this beginner's guide, you've learned how to query and filter spatial data from QGIS projects using PHP. GIS can be a powerful tool for various applications, including environmental analysis, urban planning, and more. As you become more comfortable with GIS and PHP, you can explore advanced techniques and further customize your spatial data workflows to suit your specific needs. ​
0 Comments

How to Display QGIS Map Layers on a Web Page: A Beginner's Guide to GIS

1/9/2023

0 Comments

 
​Geographic Information Systems (GIS) have revolutionised the way we analyse and visualise spatial data. QGIS, an open-source GIS software, is a powerful tool for creating maps and conducting spatial analysis. One of the exciting features of QGIS is the ability to display your map layers on a web page, making your GIS projects accessible to a wider audience. In this beginner-friendly guide, we'll walk you through the process of displaying QGIS map layers on a web page.

What You'll Need
Before we dive into the step-by-step process, here's what you'll need:

1. QGIS Software: Make sure you have QGIS installed on your computer. You can download it for free from the official website.

2. GIS Data You'll need spatial data to create your map. QGIS supports a wide range of data formats, including shapefiles, GeoJSON, and more.

3. Web Hosting  You'll need a web hosting service to publish your map online. Many options are available, from free services like GitHub Pages to paid hosting platforms.

4. Basic HTML/CSS Knowledge: While not mandatory, some familiarity with HTML and CSS will be helpful for customizing the appearance of your web map.
Step 1: Prepare Your Data

1. Open QGIS and load the data layers you want to display on your web map.

2. Ensure that your data is projected correctly. Web maps typically use the WGS 84 (EPSG: 4326) or Web Mercator (EPSG: 3857) coordinate systems.

Step 2: Install and Configure the QGIS2Web Plugin

1. In QGIS, go to the 'Plugins' menu and select 'Manage and Install Plugins.'

2. Search for 'QGIS2Web' and click 'Install.' This plugin will help you export your map for the web.

3. Once installed, you can find the QGIS2Web plugin in the 'Web' menu.

Step 3: Customize Your Web Map

1. In the QGIS2Web plugin, you can customize various aspects of your web map, such as the base map, layer styling, and pop-up information.

2. Adjust the settings according to your preferences and project requirements.

Step 4: Export Your Web Map

1. After customizing your web map, click the 'Create a web map' button in the QGIS2Web plugin.

2. Choose the export format, such as Leaflet or OpenLayers. Both are popular JavaScript libraries for web mapping.

3. Specify the output folder where your web map files will be saved.

Step 5: Publish Your Web Map

1. Upload the contents of the output folder to your web hosting service. This typically involves using an FTP client or an online file manager provided by your hosting provider.

2. Ensure that your main HTML file (e.g., index.html) is in the root directory of your hosting space.

Step 6: Share Your Web Map

1. Once your files are uploaded, access your web map by visiting the URL of your hosted HTML file.

2. Share this URL with others to showcase your interactive QGIS map on the web.

Step 7: Additional Customization (Optional)

1. If you want to further customize the appearance and behaviour of your web map, you can edit the HTML and CSS files generated by QGIS2Web.

2. You can also explore additional JavaScript libraries, such as Mapbox or Leaflet plugins, to enhance your web map's functionality.

Conclusion

Displaying QGIS map layers on a web page is an excellent way to share your geographic data and insights with a broader audience. With the help of the QGIS2Web plugin and some basic web hosting knowledge, you can create interactive and informative web maps that engage your viewers. As you gain more experience, you can explore advanced features and expand your GIS capabilities.
0 Comments

    Author

    Joe Short BSc has been involved with various mapping solutions for over twenty years.  If you are considering implementing a GIS  or have ArcGIS Pro, MapInfo Pro or QGIS training requirements, jps services would be happy to be of assistance to your organisation. 

    Archives

    September 2023
    August 2023
    March 2023
    April 2020
    March 2020
    October 2019
    September 2019
    August 2019
    July 2019
    March 2019
    November 2018
    October 2018
    August 2018
    July 2018
    November 2017
    October 2017
    September 2017
    July 2017
    February 2017
    January 2017
    December 2016
    November 2016
    October 2016
    May 2016
    February 2016
    September 2015
    August 2015
    April 2015
    February 2015
    November 2014
    October 2014
    July 2014
    June 2014
    May 2014
    March 2014
    February 2014
    December 2013
    November 2013
    October 2013
    September 2013
    August 2013
    June 2013
    May 2013
    April 2013
    February 2013
    December 2012
    October 2012
    September 2012
    August 2012
    July 2012

    Categories

    All
    Arc Gis
    Arcview
    Autodesk
    Cad
    Gis Training
    Local Government
    Mapbasic
    Mapinfo
    Quantum Gis
    Relational Databases
    Saga Gis

    RSS Feed